This Arduino library which I have created will allow you to control various functions of your radio via an Arduino micro-controller through the use of “Computer Aided Transceiver” (CAT) functions. Although the CAT command byte definitions are aimed at a Yaesu FT-857D, many of the functions should work along the FT-8*7 platform with little or no need for modification.
The library (and previous versions) can be found here:
- Current FT857D Library (rev 0.1) (7.6kb – ZIP) {arduino-1.0.1} 2012.08.17
Quick links:
Requirements:
- Arduino 1.0.1 (or more recent IDE)
- FT857D library installed
- SoftwareSerial library (comes with the IDE)
- CAT control interface from radio
- GND -> Arduino GND
- TX -> Arduino pin 3 (can be changed in library)
- RX -> Arduino pin 2 (can be changed in library)
The library makes use of SoftwareSerial to provide a non-physical serial port to issue the CAT commands, freeing up your hardware serial port for other tasks. To change the software serial pins, you would need to modify the FT857D.cpp file at the section:
extern SoftwareSerial rigCat(2,3); // rx,tx
I was able to define the pins in the Arduino sketch (outside the library portion), however, I found that the processing time required increased substantially, so I left the definition buried (for now) in the library file.
Using the Library:
#include <SoftwareSerial.h> // required by the library #include “FT857D.h” // the actual library FT857D radio; // define “radio” so that we may pass CAT commands void setup() { radio.begin(9600); // as with Serial.begin(9600); we wish to start the software serial port } void loop() { radio.setMode(“pkt”); // set mode to PKT (note these mode names are NOT case sensitive!) }Command Set:
To use the library functions, call them using the identifier you have chosen (ie. “radio” as the above example suggests). A list of the functions is as follows:
- lock on / off = radio.lock(true / false);
- PTT on / off = radio.PTT(true / false);
- Set frequency = radio.setFreq( desired frequency – no decimals );
- Set operating mode = radio.setMode( mode name – eg. usb );
- Clarifier on / off = radio.clar( true / false );
- Clarifier frequency = radio.clarFreq( desired frequency – again, no decimals );
- VFO A / B swapping = radio.switchVFO();
- Split operation on / off = radio.split( true / false );
- Repeater offset direction (+, -, simplex) = radio.rptrOffset( +, -, or s );
- Repeater offset frequency = radio.rptrOffsetFreq( offset frequench in kHz );
- CTCSS / DCS on / off = radio.squelch( DCS or TEN );
- CTCSS tone / DCS code = radio.squelchFreq( frequency, T or D );
- Read TX status = radio.chkTX(); – returns true / false
- Read RX frequency & mode = radio.getFreqMode();
Modifications:
If you wish to adapt the current library to another radio model, you may do so by editing the FT857D.h file to change the command words issued by the library. The commands are listed as #define statements and have the values indicated in the FT857-D operator’s manual in the CAT section (PDF page 66).
As an example, you will see definitions such as:
#define CAT_LOCK_ON            0x00
#define CAT_LOCK_OFF          0x80
As an example, the command words ( 0×00 and 0×80 ) can be modified to match your requirements.
If you do modify the library, or adapt portions of it to your own code, please give a small *nod* and put a little note in your code documentation to recognize the effort I have put into this project. Thanks!
Installation:
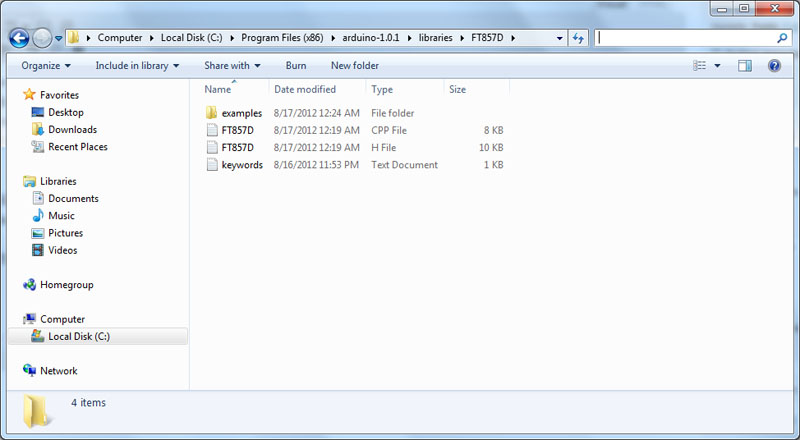
To install this library, simply extract the archived file inside the libraries directory found in the root Arduino IDE directory (ie: C:\Program Files (x86)\arduino-1.0.1\libraries)
This process will unpack a new directory named FT857D which will have the following structure:
If you prefer a more fire-and-forget installation method, you can use the executable version of the library, assuming that you have installed your Arduino IDE as:
C:\Program Files (x86)\arduino-1.0.1\
If you are using Windows 7 and the executable library “installer / zip file”, you may receive a warning (User Account Control) when you execute the file. This is completely normal. Upon finishing, you will likely receive an additional warning stating
Example:
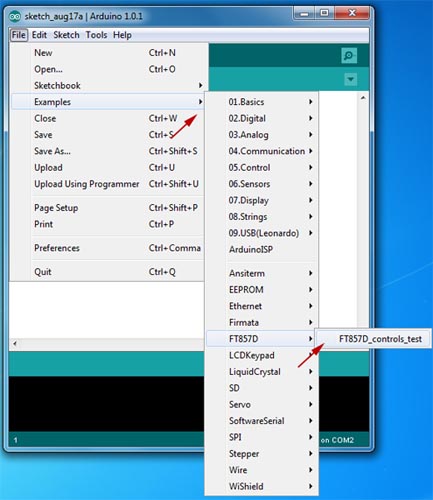
To test your physical connection to the radio, and to ensure you are able to #include the library, I would suggest you try the example sketch that is included in the library. To load the example file, simply select:
File -> Examples -> FT857D -> FT857D_controls_testThe example sketch


