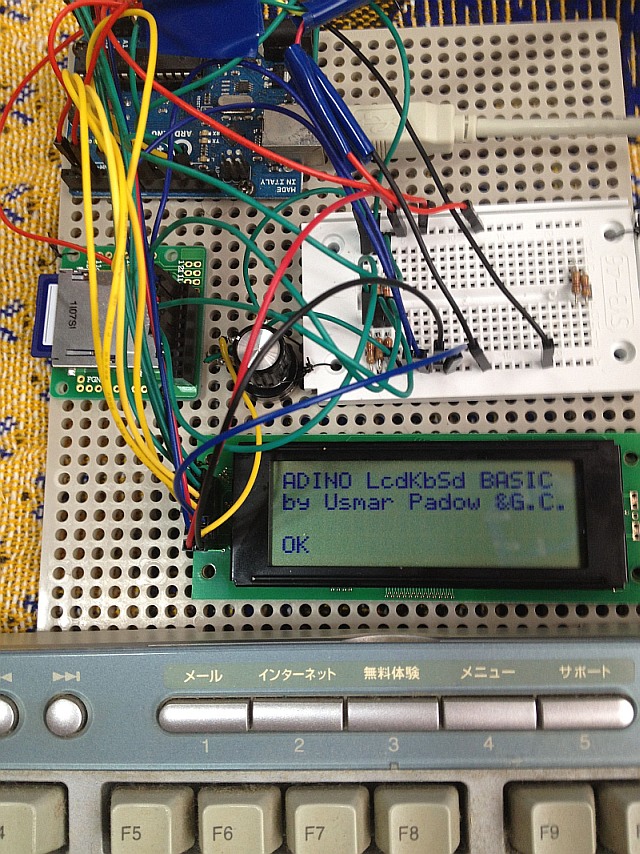
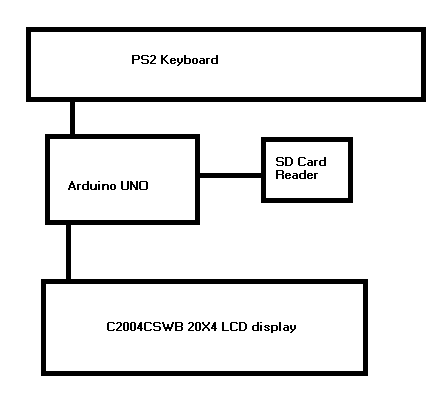
Arduino Retro Computer with LCD display Keyboard and SD card and BASIC interpreter
Copyright 2012 Usmar A Padow usmpadow@gmail.com (also known as amigojapan on freenode IRC and on youtube)
This is a stand-alone computer that you can build easily
May 13 2012: UPDATE Finally the TV version of the arduino Retro Computer is out! check it out! http://amigojapan.github.com/Arduino-Retro-Computer-TV/
May 2012, it turns out that the display I used is a standars 20X4 display, so ignore all my comments about it being strange.
May 7 2012: Added a BASIC preprocessor made in python that allows you to
write code withought line numbers and to use labels. the preprocessor
adds the lines and changes the labels to line numbers. Also made an
AmericanFootball BASIC game, as an example of how to use the
preprocessor. Also made some small changes to the firmware, so make sure
to update that too.
May 10 2012: Fixed a bug that allowed only 127 lines of BASIC in one
program, now allows 255 lines, I will increase this number when I get a
chance. AmericanFootball.BAS now works, I have finally tested it. Update
all your files!
Update: I am working on the second version of the Arduino Retro Computer, which should display stuff on a TV. here is a link with my first attempt at that
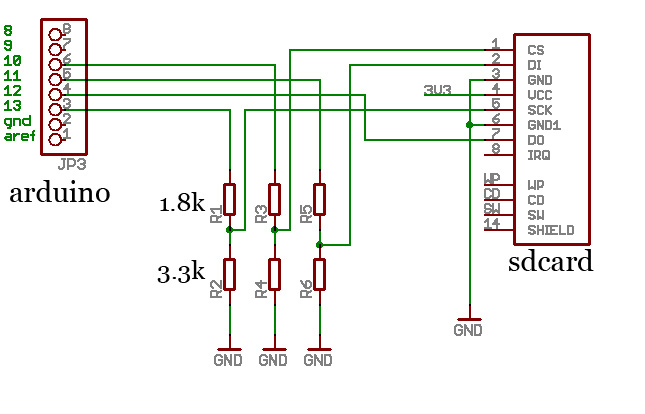
Create the SD card circuit as in (source http://www.arduino.cc/cgi-bin/yabb2/YaBB.pl?num=1206874649 )
I did not use this, but you may consider using this hack to connect an SD card using a 5.25 inch floppy disk connector:http://hackaday.com/2006/09/12/floppy-connector-mmc-card-slot/
WARNING, the SDcard library does not use a FAT file system. so any data
you may have on the SD card will be lost. you will need to reformat the
SD card to use it again on a PC.
The keyboard you use MUST be a PS2 keyboard(PS2 as in the old IBMs, not PlayStation2)
for information on how to connect the keyboard to the arudino go here:http://www.arduino.cc/playground/Main/PS2Keyboard
Download the software from https://github.com/amigojapan/Arduino-Retro-Computer-with-SD-card-and-LCD-display-and-Keyboard-input-with-BASIC-interpreter
Unpack the 2 zip files into the libraries directory of your arduino software, restart the IDE
I realize that few people will use the LCD module I used(which is a rare
Japanese one), if someone uses a normal LCD remove the driver for mine,
and replace all the print2nl() and print2 with lcd.print and
lcd.printnl and send me a copy of the working sketch to
usmpadow@gmail.com so I can put it up with this project.
In case you do get your hards on the same LCD as I used, here is it's datasheet:http://akizukidenshi.com/download/SC2004CSWB.pdf
Usmar Padow's BASIC commands:(COMMANDS MUST BE IN UPPER CASE, YOU MUST MAKE A PROGRAM, DIRECT INTERPRETATION IS NOT IMPLEMENTED)
LIST --- Displays each line of the current program line by line.
RUN --- Runs the current program
OPEN # --- Opens or creates a new program. the # parameter can be from 0 to 9. on bootup program 0 is loaded
L# PRINT "TEXT" --- prints a line of text (L# means Line Number)
L# PRINT variable_name --- prints the contents of a variable
L# REM comment -- creates a comment in the program
L# INPUT variable_name --- prompts the user to input a number, and stores it in a variable
L# variable_name=expression --- evaluates the expression and stores it in a variable. e.g. X=5+3
L# IF expression THEN L# --- evaluates expression and goes to the line
specified after THEN if the expression is true. e.g. IF X>3 THEN 10
L# FOR variable_name=# to # --- makes a FOR NEXT loop BUG FIXED! e.g FOR X=10 TO 20
L# NEXT variable_name --- ends a FOR loop e.g. NEXT X
L# GOTO L# --- goes to the line number specified
L# GOSUB L# --- goes to the line number specified and will return to the
next line when a RETURN is encountered (it seems this might be buggy
too. I will try to fix it)
L# RETURN --- return to the next line after the last GOSUB
L# END --- ends the current execution of the program at current line
to create a random number, you must set X to the minimum number then set
Y to the macimum number, then call variable_name=RND, e.g.:
10 X=10
20 Y=20
30 N=RND
40 PRINT N
this program will assign a random number between 10 and 20 to N and print it
Variables names must be a single letter of the alphabet
Preprocessor:
the preprocessor adds the lines and changes the labels to line numbers
quckbasicpreprocessor.py converts labels to line numbers
example usage:
python quckbasicpreprocessor.py AmericanFootball.qb
the new program will be stored in PROGRAM.BAS
How to upload BASIC programs to the SD card withought having to type them out:
Upload the SDmemBASIC.ino sketch to the arudino.https://github.com/amigojapan/BASIC-interpreter-for-arduino-that-uses-SD-memory-instead-or-RAM-and-ArduinoSimulator
Use a terminal program like Tera Term, connect to your arduino(if it is
terraterm, set the wait to 20ms for each char and 200ms for each line in
setup=>Serial Port)
if in windows use a text editor that supports unix new lines like geany
Open the .BAS file in the text editor
do Edit->Copy
Open the terminal program and connect to the arudino at 9600bps
do Edit->Paste
(if terra term do Edit->Paste CR)
reupload the LCD sketch to run the programs on LCD
Programs that work on the Arduino Retro Computer are welcome to usmpadow@gmail.com
If you just want to try the BASIC interpreter, here are 2 more versions of it:
this one only uses the SD card, and the Serial Terminal to communicate, no LCD screen required:
https://github.com/amigojapan/BASIC-interpreter-for-arduino-that-uses-SD-memory-instead-or-RAM-and-ArduinoSimulator
this one uses RAM, so you only need an arduino, no SD card or LCD screen, the BASIC programs are very restricted by RAM:https://github.com/amigojapan/Interactive-Arduino-Basic-Interpreter
here are another few projects I did:
http://amigojapan.github.com/Arduino-LED-Matrix-Display/
http://amigojapan.github.com/Logo-Programming-Game/
http://amigojapan.github.com/web-JavaScript-programmable-scientific-calculator/
this one is still in alpha state, but I am very excited about it, it is
an 3D Programming Language made in Unity for teaching programming to
beginners(look in source zip file inside assets subdirectory for a file
called testscript.js, you will find examples of how to program in the
language in the comments :
https://github.com/amigojapan/3dpl
and here are some games I made in GameMaker windows executables, but
they run in wine(click download on bottom right of web page):
http://sandbox.yoyogames.com/games/92441-be-osama-terrorism-strategy-game
http://sandbox.yoyogames.com/games/79888-tom-burger-2-english
http://sandbox.yoyogames.com/games/72683-pachidomi