PIC Basic - Interfacing With an LCD Screen JHD162A
This project is first part of a series of projects designed to experiment and understand how PIC microcontroller can be effectively used to interface with external circuit and get data from and control external devices. Once you have completed hands on experiment with this series you should able to design a minimal robot or other such relatively complex programmable control system.
To see a list of all basic PIC projects planned in this series please click here. To get a basic understanding of PIC microcontrollers and how to use them please click here. This link covers the basic FAQ of PIC for newbies as there is a lot of literature available on the web for advanced users.
In this project we will integrate PIC with a basic LCD with 16 charactor width and having two lines. LCD is a very important tool in PIC programing, as it can be used for debugging embedded programs easily. The other option available is to use a serial port and spit out these information on to a PC. But I prefer LCD as your board is not tied down to a PC.

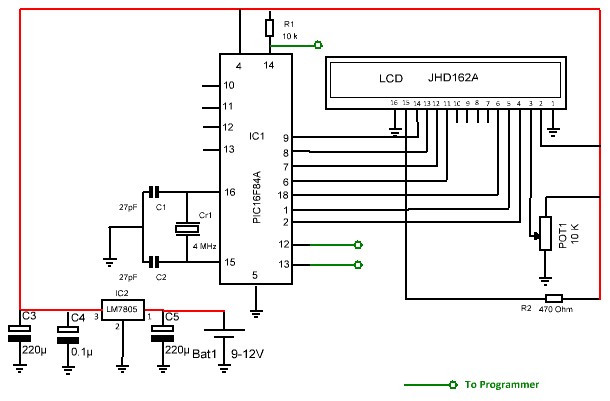
Typically the type of LCD used here has 16 pins, of which two are used for back-light (to see in the dark). Two are used for power supply. one is used for controlling the contrast of the screen. Rest 11 pins are used for send and receiving data to the LCD screen. Of the 11, eight pins are used for sending/receiving one byte (8 bits) of data at a time. Of the emaining three one is used for flaging as read/write operation. second identifies the data as a command or display data and the third is used as a clock/strobe to tell the device that data is ready to read. This LCD uses HD44780 driver chip and follows protocol specified in its datasheet for communication.
Though there are 8 pins for transmitting data we can also configure the LCD to transmit/receive data 4 bits, 2bits or 1 bit at a time. Before we start sending data for display there is an 8 step process to initialise and configure the LCD. During this process the specified delays need to be applied between the steps to correctly setup the LCD. (see below programm code for details). In this project we are using 4 bit (4 wire) transfer method.

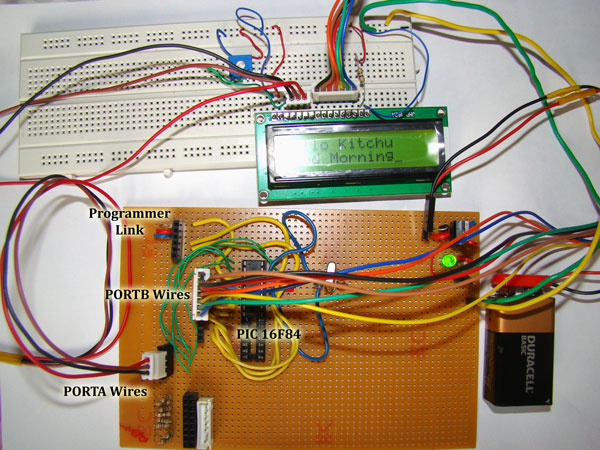
As we started using more wires to connect together these components it was observed that reliability of the connections are very important for getting the LCD working. Hence it is recommended to use a general purpose PCB and solder the components os that project can be done easily without much frustration. It is also recommended to perform an end-to-end ( chip base to LCD pins) connectivity check to ensure no broken connections.
Also go through the datasheets for PIC16F84A to get a good understanding of other details of the microcontroller.
The C compiler used for this project is Hi-TECH light
The C Main program code "lcd.h".
/*The C Main program code "lcd.c".
*/LCD interface header file
*See lcd.c for more info
*/
/* write a byte to the LCD in 4 bit mode */
extern void lcd_write(unsigned char);
/* Clear and home the LCD */
extern void lcd_clear(void);
/* write a string of characters to the LCD */
extern void lcd_puts(const char * s);
/* Go to the specified position */
extern void lcd_goto(unsigned char pos);
/* intialize the LCD - call before anything else */
extern void lcd_init(void);
extern void lcd_putch(char);
/*Set the cursor position */
#define lcd_cursor(x)lcd_write(((x)&0x7F)|0x80)
/*The C interrupt program code "main.c".
*LCD interface example
*Uses routines from delay.c
*This code will interface to a standard LCD controller
*like the Hitachi HD44780. It uses it in 4 bit mode, with
*the hardware connected as follows (the standard 14 pin
*LCD connector is used):
*
*PORTB bits 0-3 are connected to the LCD data bits 4-7 (high nibble)
*PORTA bit 3 is connected to the LCD RS input (register select)
*PORTA bit 1 is connected to the LCD EN bit (enable)
*
*To use these routines, set up the port I/O (TRISA, TRISD) then
*call lcd_init(), then other routines as required.
*
*/
#ifndef _XTAL_FREQ
// Unless specified elsewhere, 4MHz system frequency is assumed
#define _XTAL_FREQ 4000000
#endif include<htc.h>
#include "lcd.h"
#define LCD_RS RA3
#define LCD_RW RA2
#define LCD_EN RA1
#define LCD_DATAPORTB
#define LCD_STROBE()((LCD_EN = 1),(LCD_EN=0))
/* write a byte to the LCD in 4 bit mode */
void cd_write(unsigned char c)
{
__delay_us(40);
LCD_DATA = ( ( c >> 4 ) & 0x0F );
LCD_STROBE();
LCD_DATA = ( c & 0x0F );
LCD_STROBE();
}
/*
*/Clear and home the LCD
*/
void cd_clear(void)
{
LCD_RS = 0;
lcd_write(0x1);
__delay_ms(3);
}
/* write a string of chars to the LCD */
void cd_puts(const char * s)
{
LCD_RS = 1;// write characters
int i=0;
while(*s && i <16)
{
lcd_write(*s++);
i++;
}
}
/* write one character to the LCD */
void cd_putch(char c)
{
LCD_RS = 1;// write characters
lcd_write( c );
}
/*
*/Go to the specified position
*/
void cd_goto(unsigned char pos)
{
LCD_RS = 0;
lcd_write(0x80+pos);
}
/* initialise the LCD - put into 4 bit mode */
void cd_init()
{
char init_value;
//ADCON1 = 0x06;// Disable analog pins on PORTA
init_value = 0x03;
TRISA=0;
TRISB=0;
LCD_RS = 0;
LCD_EN = 0;
LCD_RW = 0;
//LCD_DATA=0x00;
__delay_ms(35);
__delay_ms(15);// wait 15mSec after power applied,
LCD_DATA = init_value;
LCD_STROBE();
__delay_ms(5);
LCD_STROBE();
__delay_us(200);
LCD_STROBE();
__delay_us(200);
LCD_DATA = 0x02;// Four bit mode
LCD_STROBE();
__delay_ms(2);
lcd_write(0x28); // Set interface length
lcd_write(0xC); // Display On, Cursor OFF, Cursor Blink OFF
lcd_clear();// Clear screen
lcd_write(0x6); // Set entry Mode
}
#ifndef _XTAL_FREQ
// Unless specified elsewhere, 4MHz system frequency is assumed
#define _XTAL_FREQ 4000000
#endif include <htc.h>
#include <string.h>
#include "lcd.h"
void ain(void)
{
const char s[] ="Hello Kitchu Welcome... ";
const char t[] ="elektroniksforkids.com ";
lcd_init(); //initialise the LCD
char * b;
char * c;
int son=1;
b=&s;
c=&t;
for(;;)
{
lcd_goto(0);// select first line
lcd_puts(b);
lcd_puts(c);
lcd_goto(0x40);// Select second line
lcd_puts("Good Morning !");
__delay_ms(250);
__delay_ms(100);
if(*b)
{
*b++; //scrolling to next char
}
else {
if(son)
{
b=&s;
c=&t;
son=0;
}
else {
b=&t;
c=&s;
son=1;
}
}
lcd_clear();
}
}
The compiled HEX file. (this can be directly burned into your PIC)
click here