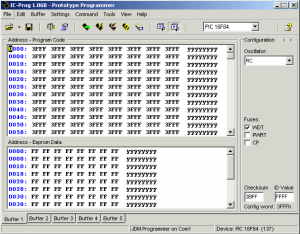
IC PROG Settings for PIC Programmer and programming PIC Using .HEX file
IC PROG Settings for JDM PIC Programmer
- Download IC Prog Software
- Start the IC Prog Software
- Go Settings → Hardware (F3)
You need the following settings in IC Prog, (select JDM Programmer and Windows API)
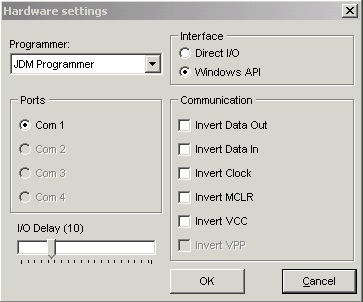
Note: If you have more ports you need to select correct com port.
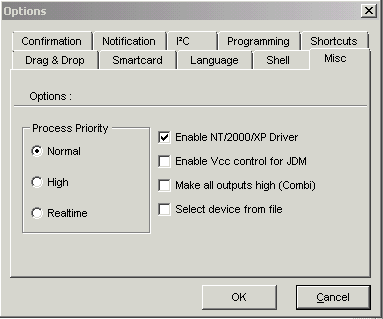
- When using NT, 2000, XP you need Installing Driver
Download the Windows NT/2000/XP Driver. Put the NT/2000 driver file (icprog.sys) in the same directory as the ICProg.exe file. In ICProg, click on ‘Settings’ in the main window and open the ‘Options’ window. Select the ‘Misc‘ tab. Click ‘Enable NT/2000/XP Driver‘. ICProg will then restart with the new driver and everything should be peachy.
- When using Vista and Windows 7 you need to installing IC Prog 1.06.
Configure Ic-prog Smartcard tab
In ICProg, click on ‘Settings’ in the main window and open the ‘Options’ window. Select the ‘Smartcard‘ tab.
Example: You need the following settings when using PIC16F84 or PIC18F84A
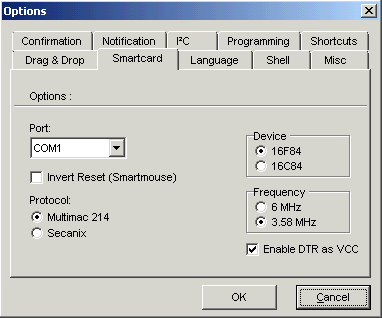
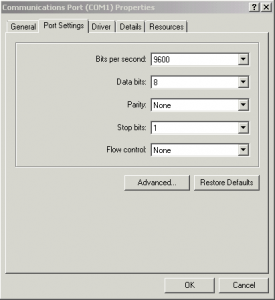
Configure the serial port in Computer
Go to the Device Manager (Start→Settings→Control Panel→Device Manager)
Ports (Com & LPT)→Double click on communications port (Com 1 or 2 ) → Port
configuration tab
Verify the following values:
Bits per second: 9600
Data bits: 8
Parity: None
Stop bits: 1
Flow control: none
Test the Programmer
- connect the programmer to computer
- Start the IC Prog software
- do a preliminary check of the serial interface by selecting Settings → Hardware Check from the menu. The following dialog box will come up:
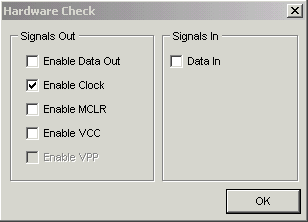
- Turn on “Enable Clock” by selecting the check box. This will allow the power and LED to be turned On or Off. If this does not work check LED and PIC Programmer Circuit.
Programming the microcontroller using IC Prog,
- Select the device (microcontroller) to be programmed. (Settings→ Device)
- Open the code file (hex file) to be written in the PIC.
Oscillator and Configuration bits are changed as indicated by the *.hex file. We can
maintain these values, or change them later if we have problems during the
programming proccess. - Programming the microcontroller,
press Program All button or F5.
![]()
During the programming, some messages will be shown:
- Device writing confirmation (if enabled)
- Programming code progress bar
- Programming data progress bar
- Programming configuration
- Verifying code (if enabled)
- Verifying data (if enabled)
IC-Prog will show the following dialog box if the verification is successful.
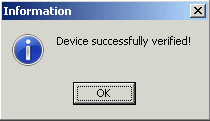
PIC Programming is done. Now you can use this PIC IC for your circuit.
If the verification fails, don’t worry, no permanent damage is done. There are two common verification failures – data and code. A data verification failure can be safely ignored and just means that the EEPROM was not fully zeroed. The message displayed will say “Verify failed at data address XXXXh”. Note the word “data” in front of “address”.

If the message says “Verify failed at address XXXXh”, note that the word “data” is not in front of “address”, then the code verify failed and there is some sort of problem.
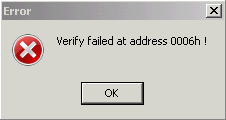
Errors solutions:
General
- Erase the PIC before writing it
- Close all other applications running on the PC
Hardware
- Check the cable connections and the number of the serial port
- Check the model of PIC that we are programming
- Check the PIC position on the socket
- Check that all the pins are correctly inserted on the socket
Software
- Check the type of PIC.
- Check Menu → Settings → Type of hardware.
- Check the number of serial port selected.
- Check that the file code (*.hex) is correct. It’s no good writing a *.txt file in the
PIC.
Other
- Change the port
- Use another PC
- Try another programmer
- Change the PIC
